
Holiday Checkerboard Cake Recipe
Introduction
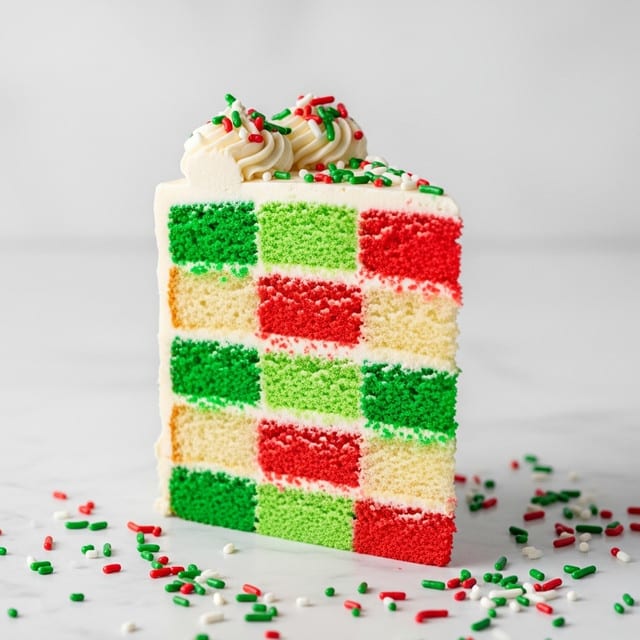
The Holiday Checkerboard Cake is a festive and visually stunning dessert perfect for special occasions. Featuring colorful layers in a playful checkerboard pattern, this cake brings a delightful surprise to every slice. Its rich buttercream frosting complements the tender, moist layers beautifully.

Ingredients
- Cooking spray
- 2 (15.25-oz.) boxes white cake mix
- 1 tbsp. cornstarch
- 8 large egg whites, room temperature
- 2 c. whole milk, room temperature
- 1 c. (2 sticks) unsalted butter, melted, cooled
- 1 c. sour cream or yogurt
- 2 drops (or more) red gel food coloring
- 3 drops green gel food coloring, divided
- 2 c. (4 sticks) unsalted butter, room temperature
- 1 tbsp. pure vanilla extract
- 1 1/2 tsp. kosher salt
- 8 c. (908 g.) confectioners’ sugar
- 3 tbsp. heavy cream
- A 6″ cake pan, a 3″ round cookie cutter
Instructions
- Step 1: Arrange a rack in the center of the oven and preheat to 350°F. Line the bottoms of two 9″ round cake pans with parchment paper and grease with cooking spray.
- Step 2: In a large bowl, mix the cake mix and cornstarch. In another bowl, whisk together egg whites, milk, melted butter, and sour cream. Pour the wet mixture into the dry ingredients and stir until fully combined.
- Step 3: Divide the batter evenly among four medium bowls. Add red gel food coloring to one bowl, stirring until the desired shade is reached. Add 2 drops of green food coloring to a second bowl and 1 drop of green to a third; leave the fourth bowl plain white. Pour the light green and dark green batters into separate prepared pans.
- Step 4: Bake the green cakes until a toothpick inserted in the center comes out clean, about 20 minutes. Let them cool slightly, then transfer to wire racks to cool completely. Wipe out the pans.
- Step 5: Line the pans again with fresh parchment and grease. Pour the white batter into one pan and the red batter into the other.
- Step 6: Bake these cakes for about 20 minutes, or until a tester comes out clean. Cool slightly, then turn out onto wire racks to cool completely.
- Step 7: Wrap all four cooled cake layers in plastic wrap and refrigerate for at least 4 hours or overnight to make cutting easier.
- Step 8: Working with one cake at a time, center the bottom of a 6″ cake pan on the red cake and trace with a paring knife to cut a circle. Use the 3″ cutter to cut a smaller circle from the center, separating the rounds carefully. Repeat with the white and green cakes. You will have four 3″ circles, four 6″ rings, and four 9″ rings. Refrigerate until firm, at least 30 minutes and up to 8 hours.
- Step 9: On a serving platter, gently reassemble the checkerboard layers by stacking rings as follows: Layer 1 with a red outer ring, white middle ring, and dark green center; Layer 2 with a light green outer ring, red middle ring, and white center; Layer 3 with a dark green outer ring, light green middle ring, and red center; Layer 4 with a white outer ring, dark green middle ring, and light green center. Refrigerate until ready to frost.
- Step 10: For the icing, in a stand mixer fitted with the paddle attachment, beat 2 cups room temperature butter, vanilla, and salt on medium-high speed until smooth.
- Step 11: Gradually add the confectioners’ sugar and heavy cream, beating on low speed and increasing to medium, until soft peaks form.
- Step 12: Spread the buttercream evenly over the top and sides of the assembled cake for a smooth, elegant finish.
Tips & Variations
- Use gel food coloring for vibrant, concentrated colors without thinning the batter.
- Allow cakes to chill fully before cutting to ensure clean, precise rings.
- For a lighter frosting, substitute half the butter with cream cheese.
- Try different color combinations to match your holiday theme or celebration.
Storage
Store the decorated cake in an airtight container in the refrigerator for up to 4 days. Before serving, let the cake sit at room temperature for 20-30 minutes to soften the buttercream. Leftover cake layers can be wrapped tightly and frozen for up to 1 month.
How to Serve
Serve this delicious recipe with your favorite sides.
FAQs
Can I use homemade cake instead of cake mix?
Yes, you can substitute your favorite homemade white cake recipe, but keep batter volume roughly the same for consistent layer sizes.
How do I keep the colors from bleeding into each other?
Make sure each cake layer is fully cooled and chilled before cutting and assembling. This firmness helps maintain clean edges and prevents colors from mixing.
Print
Holiday Checkerboard Cake Recipe
- Total Time: 5 hours 10 minutes
- Yield: 12 servings 1x
Description
This festive Holiday Checkerboard Cake features vibrant layers of red, white, and two shades of green, perfectly capturing the holiday spirit. Crafted from tender, moist white cake layers dyed with gel food coloring and assembled in a stunning checkerboard pattern, this cake is topped with a rich, creamy vanilla buttercream frosting. Ideal as a centerpiece dessert for Christmas gatherings, it combines visual appeal with classic, comforting flavors.
Ingredients
Cake Batter:
- Cooking spray
- 2 (15.25-oz.) boxes white cake mix
- 1 tbsp cornstarch
- 8 large egg whites, room temperature
- 2 cups whole milk, room temperature
- 1 cup (2 sticks) unsalted butter, melted and cooled
- 1 cup sour cream or yogurt
- 2 drops (or more) red gel food coloring
- 3 drops green gel food coloring, divided
Frosting:
- 2 cups (4 sticks) unsalted butter, room temperature
- 1 tbsp pure vanilla extract
- 1 1/2 tsp kosher salt
- 8 cups (908 g) confectioners’ sugar
- 3 tbsp heavy cream
Equipment:
- A 6” cake pan
- A 3” round cookie cutter
- Two 9” round cake pans
Instructions
- Prepare Oven and Pans: Arrange a rack in the center of the oven and preheat it to 350°F. Line the bottoms of two 9-inch round cake pans with parchment paper, then grease them with cooking spray to prevent sticking.
- Mix Cake Base: In a large bowl, combine the white cake mix and cornstarch thoroughly. In another large bowl, whisk together egg whites, whole milk, melted and cooled butter, and sour cream or yogurt until well blended. Pour the wet ingredients into the dry cake mix and stir until fully combined.
- Divide and Color Batter: Split the batter evenly into four medium bowls. Add red gel food coloring to one bowl and mix well, adjusting the color intensity as needed. To another bowl, add two drops of green gel food coloring and stir to create a darker green shade. Add one drop of green gel food coloring into a third bowl for a lighter green. Leave the fourth bowl as white batter. Pour the light green and dark green batters into the two prepared cake pans.
- Bake Green Cakes: Bake the green-colored cakes for about 20 minutes, or until a toothpick inserted into the center comes out clean. Cool the cakes slightly before turning them out onto wire racks to cool completely. Clean and wipe the pans thoroughly.
- Prepare Next Cake Layers: Line the bottoms of the clean pans with fresh parchment paper and grease with cooking spray. Pour the white batter into one pan and the red batter into the other.
- Bake White and Red Cakes: Bake these two cakes for about 20 minutes or until a tester inserted in the center comes out clean. Allow to cool slightly, then transfer onto wire racks until completely cool.
- Chill Cakes: Wrap all four cooled cake layers in plastic wrap and refrigerate for at least 4 hours or overnight to firm up the cakes, which makes cutting easier.
- Cut Checkerboard Rings and Centers: Working with one cake at a time, center the bottom of the 6-inch cake pan on top of the red cake and trace the edges with a paring knife to cut out a 6-inch circle. Position the 3-inch cutter in the center of the 6-inch circle and press down to cut a 3-inch circle, carefully separating the rounds. Repeat the process with the white and both green cakes, resulting in three cutouts per cake: one 9-inch ring, one 6-inch ring, and one 3-inch circle. Refrigerate all cut pieces until firm, from 30 minutes up to 8 hours.
- Assemble Layers: On a serving platter, gently reassemble the rings and center pieces stacked in the following pattern for each layer: Layer 1 has a red outer ring, white middle ring, and dark green center; Layer 2 has a light green outer ring, red middle ring, and white center; Layer 3 has a dark green outer ring, light green middle ring, and red center; Layer 4 has a white outer ring, dark green middle ring, and light green center. Refrigerate the assembled layers until ready to frost.
- Make Buttercream Icing: In the bowl of a stand mixer fitted with the paddle attachment, beat the softened butter, vanilla extract, and kosher salt on medium-high speed until smooth and creamy.
- Add Sugar and Cream: Gradually add the confectioners’ sugar and heavy cream while mixing on low speed, then increase to medium speed and continue beating until soft peaks form, achieving a light and fluffy texture.
- Frost the Cake: Spread the prepared buttercream icing evenly over the top and sides of the assembled checkerboard cake, smoothing it with an offset spatula or knife as desired. Chill the cake before serving to set the frosting.
Notes
- Using room temperature ingredients helps achieve a smooth batter and even baking.
- Applying gel food coloring avoids thinning the batter that liquid dyes might cause.
- Refrigerating the cake layers before cutting prevents crumbling and ensures cleaner cuts.
- For best results, chill the cake after assembling and before frosting.
- The intricate checkerboard design requires careful cutting and assembly but creates a stunning visual impact for holiday celebrations.
- Prep Time: 30 minutes
- Cook Time: 40 minutes
- Category: Dessert
- Method: Baking
- Cuisine: American
Keywords: holiday cake, checkerboard cake, festive cake, Christmas dessert, white cake, layered cake, buttercream frosting
