
Honeycomb Candy with Chocolate and Sea Salt Recipe
Introduction
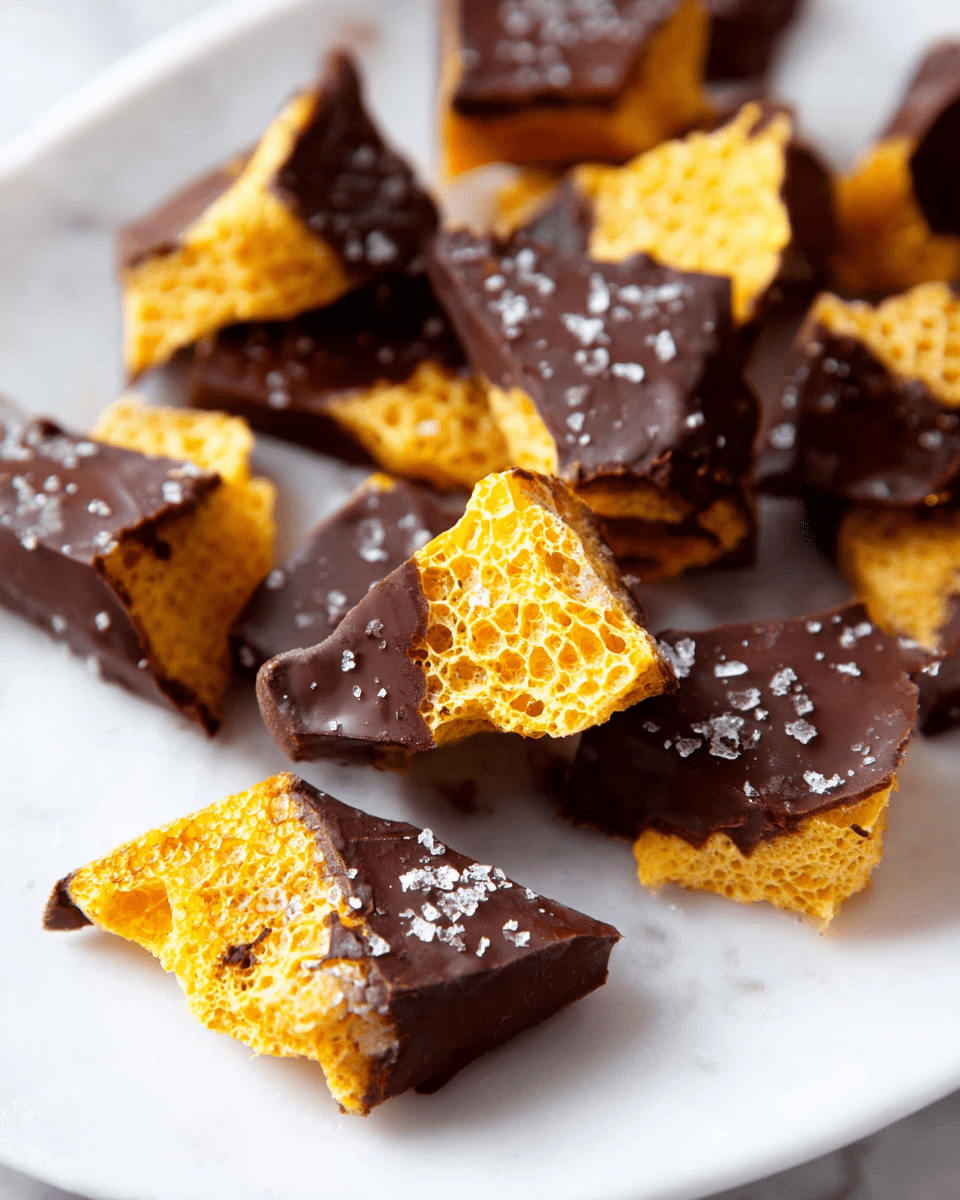
Honeycomb candy is a delightful, crunchy treat that combines a light, airy texture with rich caramel flavor. This recipe guides you through making classic honeycomb with options for a denser texture and a chocolate coating for added decadence.
Ingredients
- 350 g granulated white sugar (or brown sugar, about 1 ¾ cups)
- 160 – 170 g golden syrup (or honey; use corn syrup only if neither is available, about ½ cup)
- 120 mL water (½ cup)
- ½ tsp salt (reduce to ¼ tsp if you prefer less salty)
- 1 tbsp baking soda
- 2 tsp water
- ½ tsp gelatin
- 300 g tempered bittersweet chocolate (approximately; milk or semisweet chocolate can be used)
- Sea salt flakes (such as Maldon, for sprinkling)
Instructions
- Step 1: Line a 9-inch square pan with parchment paper covering sides and bottom. For flatter honeycomb, use a half sheet pan lined with parchment or a silpat.
- Step 2: Gather a spatula and whisk to use later. In a large saucepan, combine sugar, golden syrup, water, and salt. Stir gently to wet the sugar.
- Step 3: Heat the mixture over medium-high heat, swirling the pot frequently to dissolve sugar evenly. Use a pastry brush dipped in cold water to wash down any sugar crystals on the pot’s sides. Do not stir the syrup.
- Step 4: When the syrup boils and sugar has dissolved, clip a candy thermometer to the pot. Continue heating until the temperature reaches 300°F (150°C), swirling occasionally for even heating.
- Step 5: As the syrup nears 300°F, have your prepared pan, whisk, and spatula ready. Remove the pot from heat at 300°F and immediately add the baking soda.
- Step 6: Whisk the baking soda into the syrup thoroughly, reaching all corners. The mixture will quickly foam and expand into honeycomb.
- Step 7: Quickly scrape the foamy honeycomb into the lined pan and allow it to set and harden for several hours.
- Step 8: Once hardened, lift the honeycomb out using the parchment. Peel off the paper and break the candy into uneven pieces with a sharp knife.
- Optional Step for Denser Texture: While heating the syrup, bloom gelatin in 2 tsp water for 10 minutes. Gently microwave just until dissolved (don’t boil). Stir this into the syrup before adding baking soda, then proceed as above.
- Step 9: To coat with chocolate, temper the chocolate properly. Dip or brush the honeycomb pieces with chocolate, then place on parchment-lined baking sheet.
- Step 10: Sprinkle with sea salt flakes and let the chocolate set at room temperature; avoid refrigeration to preserve texture.
Tips & Variations
- Use a large pot to prevent overflow as the honeycomb mixture expands significantly during cooking.
- Brushing down sugar crystals prevents unwanted crystallization and grainy texture in the candy.
- Golden syrup is preferred for authentic flavor, but honey or corn syrup can work as substitutes.
- Adding gelatin yields a denser, sponge-like honeycomb if you prefer that texture.
- Tempering chocolate properly ensures a shiny finish and crisp snap on the chocolate coating.
- For a different twist, try sprinkling finely chopped nuts along with the sea salt before chocolate sets.
Storage
Store honeycomb candy in an airtight container at room temperature to keep it crisp. Avoid humidity to prevent it from becoming sticky. The candy keeps well for up to two weeks. Chocolate-coated honeycomb should also be kept at room temperature away from heat. If it softens, allow it to come back to room temperature before serving rather than refrigerating.
How to Serve

Serve this delicious recipe with your favorite sides.
FAQs
Can I use corn syrup instead of golden syrup?
Yes, corn syrup can be used if golden syrup or honey is not available, though the flavor may be slightly different. Golden syrup has a distinctive caramel taste that enhances the honeycomb.
Why is my honeycomb sticky or chewy?
Honeycomb can be sticky if the sugar syrup hasn’t reached the correct temperature (300°F/150°C) or if stored in humid conditions. Make sure to use a reliable candy thermometer and store the candy airtight away from moisture.
Print
Honeycomb Candy with Chocolate and Sea Salt Recipe
- Total Time: 3 hours (including cooling and setting time)
- Yield: Approximately 24 pieces 1x
Description
Delightfully crunchy and airy honeycomb candy made with sugar, golden syrup, and baking soda, optionally enhanced with gelatin for a denser texture and coated in tempered bittersweet chocolate with a sprinkle of sea salt for a perfect balance of sweet and salty.
Ingredients
Main Ingredients
- 350 g granulated white sugar (or brown sugar, 1 ¾ cup)
- 160 – 170 g golden syrup (or honey, ½ cup; use corn syrup only if neither is available)
- 120 mL water (½ cup)
- ½ tsp salt (use only ¼ tsp if you prefer less salt flavor)
- 1 tbsp baking soda
- 2 tsp water (for gelatin bloom)
- ½ tsp gelatin (optional, for denser texture)
Chocolate Coating
- 300 g tempered bittersweet chocolate (could substitute milk or semisweet chocolate)
- Sea salt flakes (e.g., Maldon sea salt flakes) for garnish
Instructions
- Prepare the Pan: Line a 9-inch square pan with parchment paper on the sides and bottom or use a half sheet baking pan lined with parchment or Silpat for a flatter honeycomb. Set aside.
- Ready Your Tools: Keep a spatula and whisk within reach; they will be needed near the end of the cooking process.
- Combine Ingredients: In a large saucepan, place sugar, golden syrup, water, and salt. Stir gently to saturate the sugar with water without vigorous stirring.
- Heat the Sugar Mixture: Place the saucepan over medium-high heat. Swirl the pot frequently to help dissolve sugar, brushing down the sides with a cold-water dipped pastry brush to prevent crystallization. Do not stir the syrup.
- Monitor Temperature: Once the sugar dissolves and the mixture boils, attach a candy thermometer to the pot and continue heating the syrup to 300°F (150°C), swirling occasionally for even heat distribution.
- Prepare to Finish: When the syrup nears 300°F, get your prepared pan, whisk, and spatula ready. Oven mitts may be used for safety during whisking.
- Add Baking Soda: Remove the pot from heat at 300°F. Immediately add all baking soda and whisk vigorously to distribute it evenly. The mixture will foam and expand rapidly into honeycomb.
- Transfer Mixture: Quickly pour or scrape the foamy honeycomb into the prepared pan, spreading evenly without pressing.
- Allow to Harden: Let the honeycomb cool and harden completely for a few hours at room temperature.
- Break into Pieces: Once set, remove the honeycomb from the pan by peeling off parchment. Break into irregular pieces using the tip of a sharp knife.
- Optional Gelatin Addition for Denser Texture: While syrup is cooking, bloom gelatin in 2 tsp water for 10 minutes in a microwave-safe bowl. Microwave briefly to dissolve without boiling, then add it to the sugar syrup before adding baking soda. Whisk well and proceed as usual.
- Temper Chocolate: Temper 300 g bittersweet chocolate following proper tempering steps to ensure a shiny finish and crisp snap.
- Coat Honeycomb: Dip the cooled honeycomb pieces fully or partially into tempered chocolate, or brush them with chocolate using a dry pastry brush.
- Finish and Garnish: Place the coated honeycomb on parchment paper-lined baking sheet and sprinkle with sea salt flakes immediately before chocolate sets.
- Set Chocolate: Allow chocolate to set at room temperature; avoid refrigerating to prevent condensation and loss of shine.
Notes
- Use a large pot to allow for expansion of the honeycomb once baking soda is added.
- Do not stir the sugar syrup while heating to avoid crystallization.
- Brushing down the sides of the pot with a wet pastry brush is crucial to prevent sugar crystals from forming.
- Use a candy thermometer for accurate temperature measurement to reach hard crack stage (300°F/150°C).
- The gelatin addition is optional and creates a denser, sponge-like texture in the candy.
- When handling hot sugar syrup, exercise extreme caution as it can cause severe burns.
- Tempered chocolate will provide the best texture and appearance for coating; untempered chocolate may have a dull finish and oily texture.
- Store finished honeycomb candy in an airtight container at room temperature to maintain crispness.
- Prep Time: 15 minutes
- Cook Time: 15 minutes
- Category: Candy
- Method: Stovetop
- Cuisine: British
Keywords: honeycomb candy, sponge toffee, cinder toffee, crunchy candy, homemade candy, chocolate coated honeycomb, easy candy recipe


